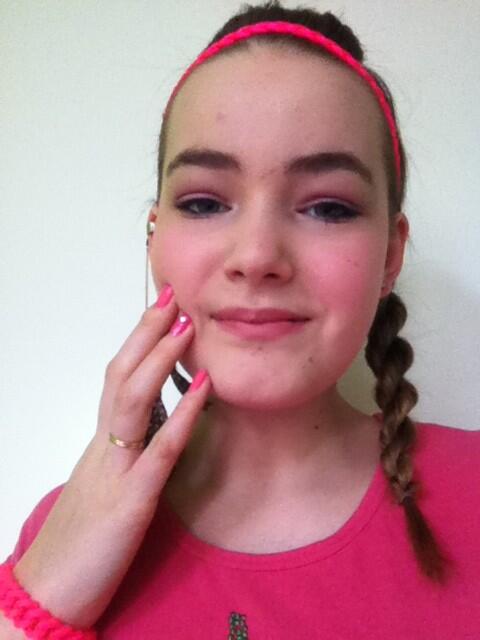
Hi girls!
Today I have a Look
Of The Day (LOTD) for you: Think Pink. I’m going to show you what my look of
the day was (hair, makeup, nails) and how I made it. I took the colour pink
(and a little bit of purple) and made a look with it. I’ll put a list with all
the products I used at the end of the article and I hope you’ll enjoy!
- Notice: I don’t wear this much makeup on a regular, daily basis. It was just for this article and I like to do this, because doing makeup is my hobby. I also look very red on the pictures, which I don't in real life.
- Notice: I don’t wear this much makeup on a regular, daily basis. It was just for this article and I like to do this, because doing makeup is my hobby. I also look very red on the pictures, which I don't in real life.

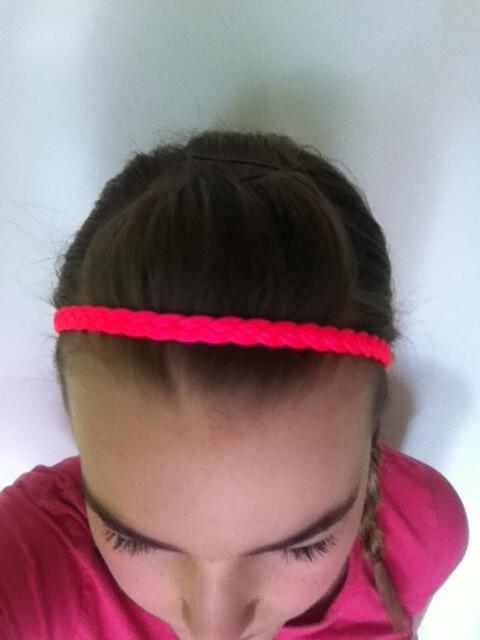
So first, I’m going to tell you how I did my hair. I think it looks very cute and it is very simple to create if you know the technique. I have bangs, so I wanted them to get out of my face. I took 2 bobby pins and pinned my bangs up on my head. I crossed the 2 bobby pins, so my hair would be very secure.
I took the rest of my hair to one side and divided it into 2 sections. I twisted the both sections in the same direction: away from my face (counter clockwise). Then I twisted them together in the opposite direction: to my face (clockwise). If you do this, the hair will be nice and secure and will not untwist again. It’s hard to explain, but if you don’t understand the technique, you can also watch this video by bebexo: http://www.youtube.com/watch?v=tV8-1-ggLf8
The last step is to put a cute headband in your hair if you want to.
Then I did my makeup.
Of course I started off with my moisturizer. This is very important, because it
keeps your skin healthy and moisturized. Then I did my basic face makeup.
I started off with foundation. I applied this on my whole face and I took it a little bit down my neck as well. This takes away a little bit of redness in my face and gives it a healthy glow. Then I applied concealer under my eyes (this makes you look more awake) and on red spots or pimples (like the big one on my forehead, LOL :P) on my face to cover them up a little bit. After that, I applied compact powder to set the foundation and concealer and to make my face more matt, so I won’t look oily.
I also applied blush on the apples of my cheeks, to bring more colour to my face and I think it looks cute! Then I applied some eyebrow filler by Catrice to fill in the little gaps in my eyebrows.

Moving on to the eyes. I first applied eyeshadow base on my eyelids to make
the eyeshadows look more pigmented, it helps the eyeshadows to stay on all day long and it prevents creasing.
Then I applied white eyeshadow as a highlighter in the inner corners of my eyes and on my brow bone. After that, I applied pink eyeshadow on my eyelid up until the crease. Then I applied purple eyeshadow to my crease (the fold between your eyelid and your brow bone) to add more dimension. The last colour I used is a darker shade of purple and I applied it to the outer corners of my eyes (in a little >). This gives even more dimension to your eyes. I also took some of this colour, and applied it to my lower lash line. Then I blended all the eyeshadows together with a fluffy, soft blending brush to make sure that there are no harsh lines.
After that, I applied some gel liner to my upper lash line and my water lines because I like the look of it and it makes my eyes stand out more. Then I curled my eyelashes with an eyelash curler and applied mascara to my upper and lower lashes. I have short lashes and they’re also not very curled, so when I apply mascara you can hardly notice. That’s why I like to curl my lashes, but if you don’t need it, don’t do it. It’s not very good for your eyelashes to curl them every day (I don't do it every day too).
The last thing I did for my makeup, was putting a nude lipstick on my lips. This completes the look.

Then moving on to the nails. I applied 2 coats of pink nail polish to all my nails. Then I applied a coat of pink glitter topcoat to the nails of my thumb and ring finger. After that, I applied little hearts (rhinestones) to these fingers and covered all my nails with a layer of topcoat. Also a fun fact to know: if you put topcoat on top of a rhinestone, it makes it matt.
These are the products
I’ve used (from left to right):
Makeup (everything
except the eye makeup)


HEMA foundation in the colour 2
Catrice camouflage cream (concealer) in the colour 010 Ivory
MAX Pressed Powder Foundation in (DFC 261) Nude
Essence silky touch blush in the colour 20 babydoll
Essence powder brush (for my powder and blush)
Catrice Eyebrow filler (there's only one colour)
Nude lipstick, it has no brand or name :P
Catrice camouflage cream (concealer) in the colour 010 Ivory
MAX Pressed Powder Foundation in (DFC 261) Nude
Essence silky touch blush in the colour 20 babydoll
Essence powder brush (for my powder and blush)
Catrice Eyebrow filler (there's only one colour)
Nude lipstick, it has no brand or name :P
Makeup (the eye
makeup)

Essence I love stage eyeshadow base
Basic concept eyeshadow palette (it has no name or number)
Essence eyeshadow in the colour 56 hyped up
Essence gel eyeliner in the colour 02 london baby
Essence eyeliner brush
Essence eyeshadow brush
Essence crease brush
HEMA blending brush
HEMA eyelash curler
Rimmel london Scandaleyes show off mascara
Nails

Maybelline Color show nailpolish in the colour: 262 pink boom.
Essence colour&go nailpolish in the colour: 105 party princess.
MAX (Action) Nails Top Coat.MAX (Action) and more nail paradise set.
Maybelline Color show nailpolish in the colour: 262 pink boom.
Essence colour&go nailpolish in the colour: 105 party princess.
MAX (Action) Nails Top Coat.MAX (Action) and more nail paradise set.
This was my Look Of
The Day! It was a long article, but I hope you still enjoyed
reading it. Let me know what you think about my look in the comments and if you have questions for me or if
you want to read a review of a product, then you can also place a comment down
below and I’ll see what I can do for you! J
Until
next time!
Xoxo' Janneke!